
Nike Air Max air cushion sole repair inflate refill
Is it possible to repair or inflate Nike Air Max air cushion soles?
Yes, with a little craftsmanship and the CABRIODOC repair kit it is possible! The following repair instructions describe how the Nike Air Max sneakers are constructed and how the air sole can be repaired and refilled.
On YouTube there are some adventurous videos on the subject. There are people who injected viscous silicone from the hardware store or tire sealant into the air chamber. We have tested all this and amused ourselves deliciously. Tire sealant does not work at all. In the case of silicone, we, as professionals, injected thin liquid silicone and were initially very pleased until we put the shoes on. The shoe with the silicone filling felt like "lead on the feet". The weight gain from the heavy silicone was about 200 grams (0,44 lbs) and the walking comfort was not optimal. So, true to our slogan "Just repair it!", we took a close look at the issue and developed a completely new repair solution.
Structure and construction of the Nike Air Max air cushion soles
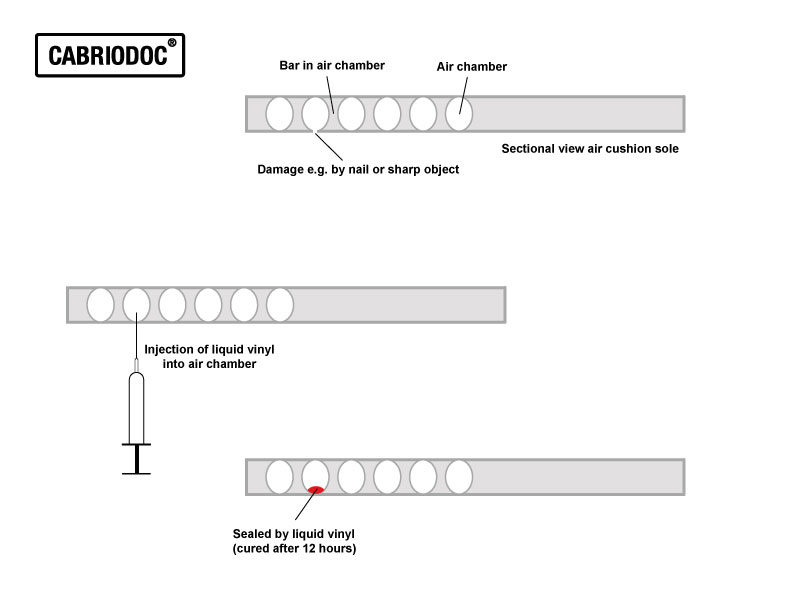
There are four different air cushion soles:
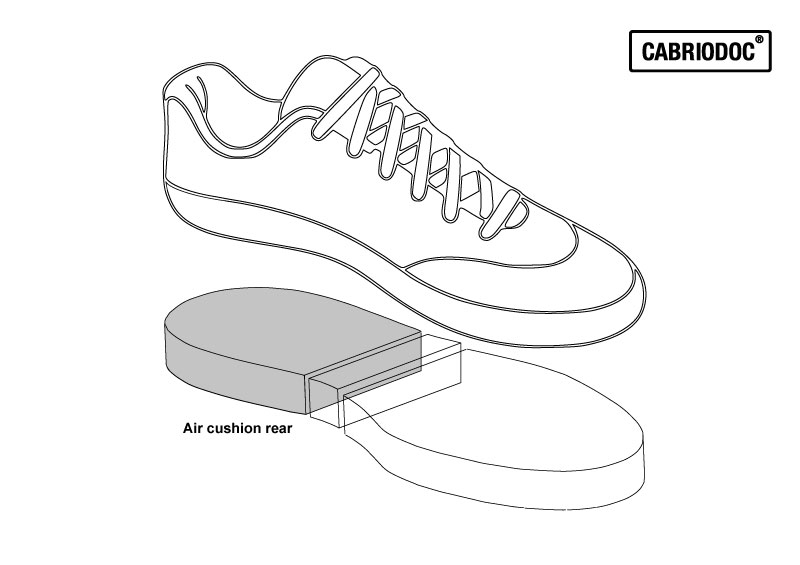
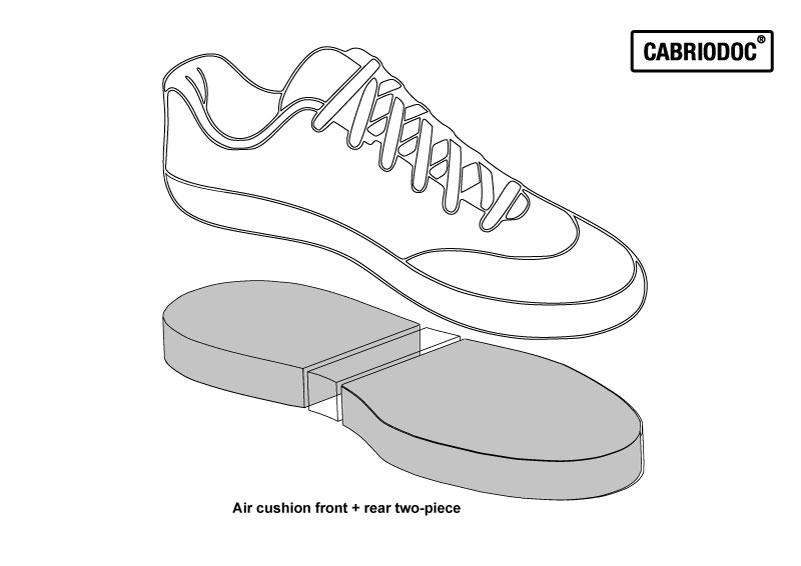
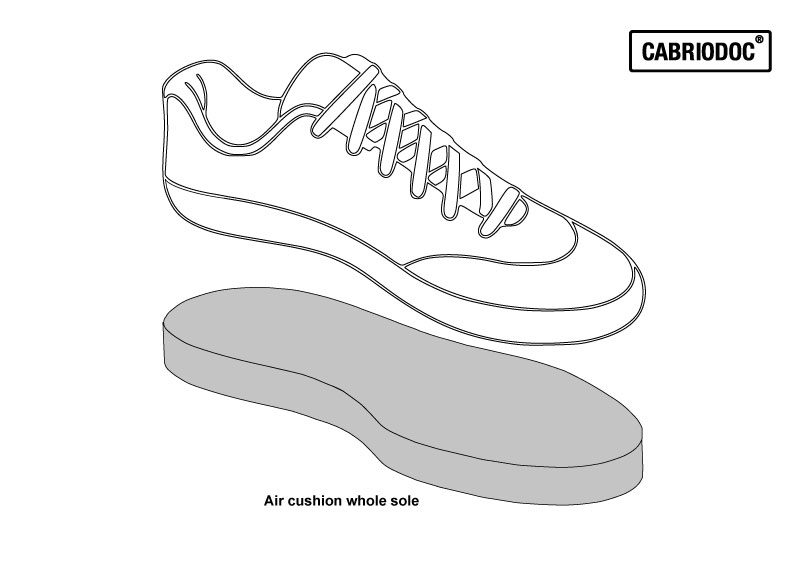
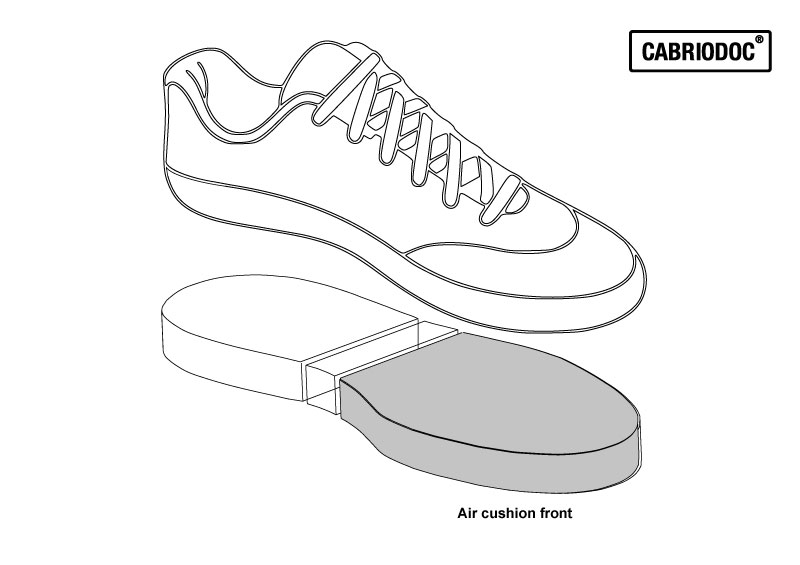
Warning
Only shoes that are in good general condition should be repaired. Worn shoes with expired soles and other age-related defects, should not be repaired. If repairs have already been made with other sealants or adhesives, we strongly advise against further repairs, as our liquid vinyl can no longer adhere in such cases. This applies in particular to silicone. The liquid vinyl is also not suitable for repairing or touching up the soles of shoes.
Repair instructions
Before the repair, the shoes should be cleaned carefully.
Find the leaking spot
Mix household washing-up liquid with water and fill into a pump sprayer. Wet air cushion sole with it. Press air cushion sole. Soap bubbles will now form at the leaking spots. Mark the areas with a pencil. If no bubbles form, the sneaker may also be leaking in internal, invisible places. Or the shoe suffers from age-related material fatigue, which leads to hairline cracks. In this case, repair is very complex to impossible. Rinse with a damp cloth and let shoes dry.
Seal leaking area
Dry the repair area carefully and clean with cleaning alcohol (isopropanol). Adhesive and sealant residues or patches from previous repairs must be completely removed. This can be done mechanically or by sparing and careful use of solvents, e.g. acetone. But be careful: acetone can dissolve and dull the plastic. Clean preparatory work is essential for a successful repair.
Place the repair area as horizontally as possible on the table. If a horizontal position is not possible, the viscous liquid vinyl can also be applied to slightly sloping surfaces. In this case, however, the liquid vinyl should be applied in several thin layers to reduce running.
Repair area on the outside of the air cushion sole
Apply CABRIODOC liquid vinyl approx. 2 mm (0.078 in) high and approx. 10 mm (0.39 in) wide overlapping onto the damage accessible from the outside and simply allow to run. Do not apply a thicker layer. This will lead to problems during curing. Do not touch the uncured adhesive area or rework it mechanically, e.g. with a spatula or finger! The liquid vinyl shrinks by approx. 75 % after curing. To achieve a higher layer thickness and stability, the liquid vinyl should be applied in at least two layers. After applying the first layer, wait approx. 2-3 hours before applying the next layer. The liquid vinyl is fully cured after 10-12 hours and should not be loaded before. Even after complete curing, additional layers can be applied. The repair area can be reworked again and again, if necessary.
Repair area inside the air cushion sole
In the case of internal repair areas (e.g. nail in the sole), the liquid vinyl can also be injected into the air cushion sole. For this purpose, the liquid vinyl is transferred into the disposable syringe by using the adapter (included in the scope of delivery). The liquid vinyl is then injected into the sole from below using the blunt cannula 21G green 0.8 mm (0.03 in). The shoe should be held in a horizontal position for this purpose. This allows the liquid vinyl to run in the air cushion and seal the repair area over a large area. Pull out the syringe with the cannula and wait 10-12 hours until the liquid vinyl has cured.
Caution: The blunt cannula 21G green 0.8 mm (0.03 in) is not suitable for piercing the capsule valves for the purpose of filling with air. Only the sharp cannula 23G blue 0.6 mm (0.02 in) may be used for this purpose!
Tip! Work free of bubbles. Squeeze some liquid vinyl into a cloth and hold the tube down until a small bubble-free drop has formed. Then place the drop on the repair area and apply the liquid vinyl in one operation without setting it off. Air bubbles can be removed as long as the liquid vinyl is still wet, carefully puncture them with a needle.
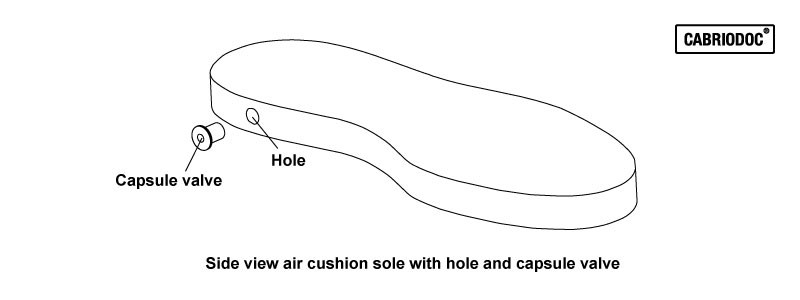
Installing the capsule valve
Warning: Risk of injury from the hollow cutting drill!
Before drilling the hole for the capsule valve, the installation location should be carefully selected. The air cushions are all constructed differently on the inside. Depending on the model, there are various reinforcement and supports on the inside. It is therefore not possible to recommend a universal installation location here. Once a suitable installation location has been found, the hole can be carefully drilled into the air cushion. Normal wood, plastic or metal drills are not suitable for this! These drills damage the air chamber and do not create a clean drill hole. After countless trials, we have developed a special cutting drill. The CABRIODOC hollow cutting drill (8 mm / 0.32 in) fits all standard drill chucks and drilling machines. The cutting drill is flat and can therefore slip at the beginning. Carefully press into the soft plastic with a little more pressure and cut the hole at low speed. Since it is impossible to drill exactly at a 90 degree angle, the drilled out part usually gets stuck in one spot. Fold the part outward and cut it off with curved nail scissors or a cutter knife. Carefully clean the drilling site with the CABRIODOC cleaning cloth!
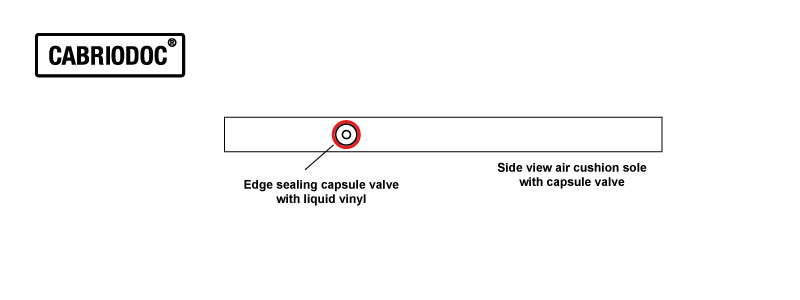
Then apply the CABRIODOC liquid vinyl around the drill hole to a height of approx. 2 mm (0.078 in). The application width should overlap the diameter of the capsule valve. Then the capsule valve is inserted into the hole and pressed on. For curved surfaces, the capsule valve should be fixed with paper masking tape. In this way, the capsule valve adapts to the surface. Caution: Do not use plastic adhesive tape. This cannot be removed after curing. After 2-3 hours, remove the masking tape and seal the outer edge of the capsule valve with an additional layer of liquid vinyl. After 10-12 hours, the liquid vinyl is completely cured and the air cushion sole can be filled.
Refilling the air cushion with gas
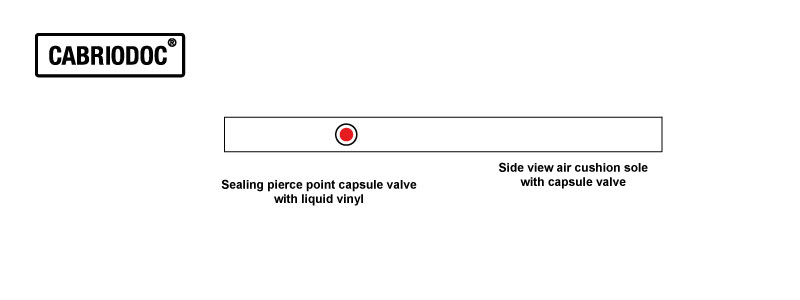
Warning: Risk of injury from the sharp cannula 23G blue 0.6 mm (0.02 in)!
Pierce the capsule valve with the sharp cannula 23G blue 0.6 mm (0.02 in). Carefully and slowly insert the cannula vertically at a 90° angle into the center of the red dot. Do not insert the needle too deeply, otherwise other internal parts of the air chamber may be damaged. Connect the hose to the ball pump. Carefully inflate to approx. 0.6 - 0.8 bar (8.7 - 11.6 psi). Maximum recommended pressure 1 bar (14.5 psi). Pull out the cannula slowly and carefully. Do not frighten : After pulling out, air audibly escapes. This air escapes from the tube and the pump, not from the air cushion sole. Afterwards, the puncture site must be sealed with a drop of liquid vinyl. After 10-12 hours the drop is cured. Only after this time the shoe can be loaded.
Fill the air cushion several times with gas and equalize the pressure
The capsule valve can be pierced up to three times with the cannula to equalize the pressure. After each gas injection, however, the puncture site must be sealed again with a drop of liquid vinyl. Observe the curing time!
It is also possible to adjust the pressure individually. To do this, the shoe can be carefully put on with the cannula inserted and the hose with the air pump. Gently apply pressure to the shoe and do not jump. Increase or release the pressure with the pump. To release, briefly press the button on the back of the pump. Then remove the shoe and carefully pull out the cannula. Do not forget to seal the capsule valve again. Of course, the second, intact shoe should also be worn during this action in order to get the right feeling for both shoes.
Note on the gas types
According to Nike, the air cushions are filled with nitrogen at the factory. Breathing air consists of about 78% nitrogen and about 20% oxygen. We are currently running long-term tests on this and will report whether there is much difference between filling with breathing air or nitrogen. Filling with pure nitrogen from cartridges or gas cylinders would be possible, but would make the repair kit more expensive, since we would have to supply a special filling device. Additional costs approx. 100 - 200 Euro / USD. If you want to make a commercial run of the repairs, please contact us. If there is sufficient demand, we could offer a solution for filling with nitrogen.
Scope of delivery of repair sets
Set with ball pump
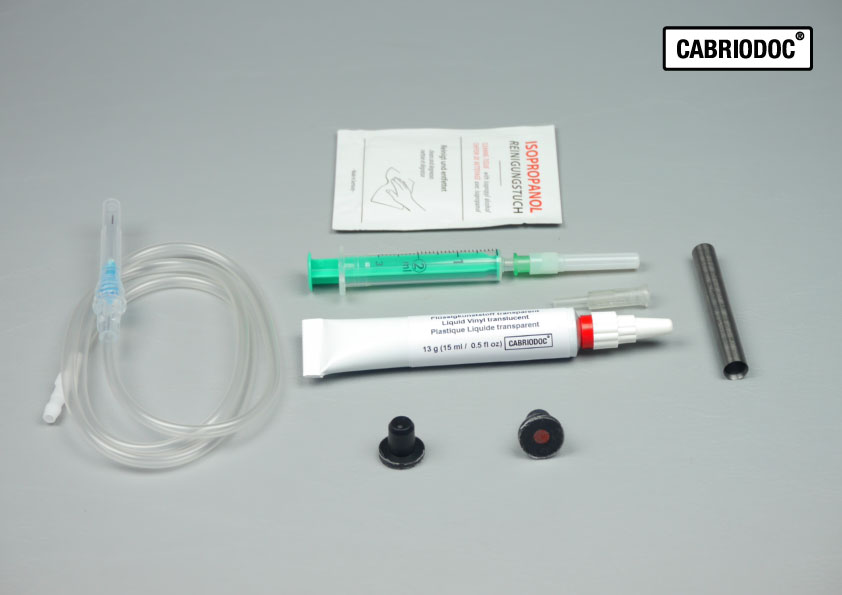
1 x CABRIODOC liquid vinyl transparent 15 ml (0.5 fl oz.) to seal the air cushions and to glue and seal the valve
Shelf life when stored in a dry and cool place:
Unopened approx. 2 years. Opened approx. 2-3 weeks, because the solvents escape through the plastic cap.
But there is a trick:
Place aluminum foil in two layers over the tube opening, put on the cap and carefully close it.
This creates a new aluminum membrane through which the solvents cannot escape so easily.
1 x Disposable syringe with blunt cannula 21G green 0.8 mm (0.03 in) for inserting liquid vinyl into the air cushion
1 x Adapter disposable syringe to tube for transferring liquid vinyl into the syringe
2 x CABRIODOC capsule valve
1 x CABRIODOC hollow cutting drill (Attention: Oil residues on the drill!)
1 x CABRIODOC cleaning cloth to clean the drilling site before gluing the capsule valve in place
1 x Sharp cannula 23G blue 0.6 mm (0.02 in) with tube connection 4 mm (0.16 in) to fill in the air
1 x Ball pump with nanometer bar / psi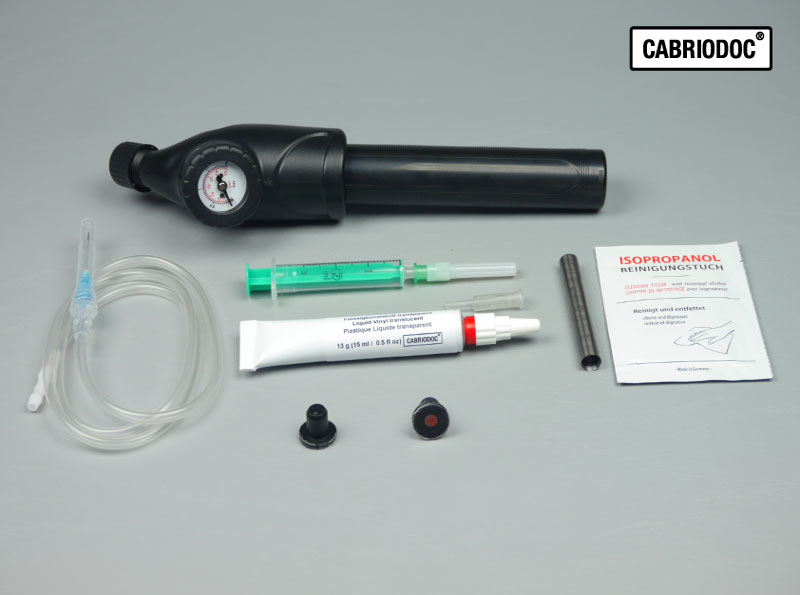
Set without ball pump
If you own a ball pump with pressure gauge and 4 mm (0.16 in) rubber seal at the outlet, the set can also be ordered without pump. Most ball pumps have a rubber seal with 4 mm (0.16 in) and 7 mm (0.27 in) at the outlet. If necessary, open the cap and simply turn the seal over.
Warning overpressure
Do not use bicycle pumps or air compressors. These generate up to 10 bar (145 psi) pressure and would damage the air cushions. In addition, the pressure gauges on these devices are very inaccurate in the lower 0-1 bar (0-14.5 psi) range.
The following tools are NOT included in the delivery:
Detergent, soft brush. Leak detection agent (dishwashing liquid + pump sprayer), speed controlled drill or cordless drill, masking tape, nail scissors, cutter knife, gloves, protective goggles and vacuum cleaner, etc.
Trademark information
NIKE is a registered trademark of Nike Inc. and its subsidiaries. The brand name is mentioned here only to assign repair kits to an application in the sense of "suitable for:".